

Imagine you want to travel to France. ✈ Would you travel in a plane you know is untested? No right? It would be scary. 😨 What if that plane has engine problems or some others that may affect its functioning and cause an accident. 🚧 Testing is an imperative process, not only in software development but also in many different fields.
In the dev world, while developing, maintaining, or refactoring our apps, there is a high likelihood we are adding bugs 🐞🐞 that may cause problems in production. That is why an automated process of testing is mandatory; it helps us to prevent bugs and other issues they can trigger.
Hi! I'm Ernesto, and in this post, I'll give you an introduction to testing in React; so you can prevent many problems in the future. 🧐
Table of content
- What is software testing?
- Set up the environment
- Testing in React
- Bonus: Where do I keep my test files?
- Conclusions
What is software testing?
It is the process of testing 🧪 your application or software product before you send it to production. It involves evaluating and verifying that your app does what it is supposed to do. 🔍 There are two main types of testing, unit and integration testing.
Unit and integration testing
Unit testing focuses on individual modules 🟦 of the application (a component), whereas integration testing focuses on multiple modules 🟦🟦 and how they work together.
Unit tests are easier to write and quicker to execute. Remember to test all your components as individuals before you make an integration test.
Set up the environment
Now is when we can thank create-react-app for existing. 😅 It does most of the work of setting up our workspace, including most of the configuration for testing, saving us a lot of time. 😎
Jest
It is a node-based JavaScript testing framework, which means that it allows us to run fast parallel tests. Jest comes by default with every create-react-app project. 😁
Jest has some methods we can use to create our tests.
test(): It is the function that has all the logic for our tests.expect(): We use this function when we want to test a value. It is usually used inside the test function.We use other functions along with
expect():toBe(value): It is a function that allows us to compare primitive values.toEqual(object): It is a function that allows us to compare objects.
describe(): It is a function that allows us to create bundles of tests. It takes two arguments; the description of the test bundle and the actual tests.
You can find the complete list of methods in the documentation.
Enzyme
It is a testing utility for React developed by Airbnb. React comes, by default, with its test suite, but it can be kind of tedious to manage. Enzyme makes it easier to test our React components.
Unlike Jest, Enzyme is not included in create-react-app 😔, so we have to install it.
Note: Enzyme does not support React 17 (last version) yet. That is why we will use an unofficial adapter made by Wojciech Maj.
If you are working with React 16, there is no problem. You can install Enzyme as specified in the documentation.
Run the following command to add Enzyme to your project.
# If using React 17
npm install --save-dev enzyme @wojtekmaj/enzyme-adapter-react-17

# If using React 16
npm install --save-dev enzyme enzyme-adapter-react-16
Like Jest, Enzyme comes bundled with handy methods to make tests:
shallow(component): Returns a simulated component where we can select all of its elements or props.simulatedComponent.find('query'): This function helps us to find elements that our simulated component contains.If it finds more than one element, we can use the
at(number)function to select one from the list.
You can find the complete list of methods in the documentation.
Setup configuration
As mentioned before, create-react-app includes Jest by default, but it does not include Enzyme. Inside the setupTest file, add the following lines.
//Setup for Jest
import '@testing-library/jest-dom';

//Setup for Enzyme
import Enzyme from 'enzyme';
import Adapter from '@wojtekmaj/enzyme-adapter-react-17';

Enzyme.configure({ adapter: new Adapter() });
Now that we have everything set up, let's go to the fun part. 😆😆
I will use create-react-app for the following example.
Testing in React
Most of our test files will have the same structure.
//React
import React from 'react';

//Shallow will simulate a component rendering
import { shallow } from 'enzyme';

//The component we want to test
import YourComponentName from 'route-to-your-component';

//Test bundle
describe('Test bundle description', () => {
  //Test
  test('should do something', () => {
    //Test logic
    expect(received_value).toBe(expected_value);
  });

  //Test
  test('should ...', () => {
    //...
  });
});
Basic tests
Let's go with a classic example 🥁🥁, a counter component. 😅😅
const Counter = ({ number }) => {
  const [counter, setCounter] = useState(number);

  const handleAddition = () => {
    setCounter((prevCounter) => prevCounter + 1);
  };

  const handleSubtraction = () => {
    if (counter > 5) {
      setCounter((prevCounter) => prevCounter - 1);
    }
  };

  return (
    <div className="main-comp">
      <h1 className="title">INTRO TO TESTING IN REACT</h1>
      <div className="counter">
        <div className="controls">
          <button onClick={handleSubtraction}>-</button>
          <p>{counter}</p>
          <button onClick={handleAddition}>+</button>
        </div>
      </div>
      <h2>The number that comes from the props is: {number}</h2>
    </div>
  );
};

//Default props
Counter.defaultProps = {
    number: 15
};
We have a counter component where we use the useState hook to manage the counter value. Also, it receives a number prop, which the default value is 15. This value will be the initial value for our counter.
Let's create our test file and name it Counter.test.js.
The naming convention is
YouComponentName.test.js.
//React
import React from 'react';
//Shallow will simulate a component rendering
import { shallow } from 'enzyme';
//The component we want to test
import Counter from '../Counter';

//Test bundle
describe('Basic tests in Counter Component', () => {

  //Test 1
  test('should print expected h2 with default number prop', () => {
    //Expected h2
    const expectedH2 = `The number that comes from the props is: ${15}`;
    //Simulation of the component rendering (with no props)
    const wrapper = shallow(<Counter />);
    //h2 that our component renders
    const foundH2 = wrapper.find('h2').text();
    //Comparison of values
    expect(foundH2).toBe(expectedH2);
  });

  //Test 2
  test('should print expected h2 with number prop', () => {
    //Number that we will sent as number prop
    const sentProp = 25;
    //Expected h2
    const h2 = `The number that comes from the props is: ${sentProp}`;
    //Simulation of the component rendering (with number prop)
    const wrapper = shallow(<Counter number={sentProp} />);
    //h2 that our component renders
    const foundH2 = wrapper.find('h2').text();
    //Comparison of values
    expect(foundH2).toBe(h2);
  });

});
We are testing the number prop that our Counter Component receives, specifically the h2 tag that contains this prop.
In the first test, we do not pass any prop; therefore, it will take its default value (15). We create a variable that will be the h2 that we expect. Then we simulate the component rendering and select the h2 tag we want to test. Finally, we compare this value we got with the expected value. In the second test, we do something similar. But in this case, we pass the number prop to the component. Therefore, the expected h2 will not render the default value but the value we sent.
To run all tests execute this command:
npm run test
- Press "a" to re-run all tests.
- Press "w" to see more options.
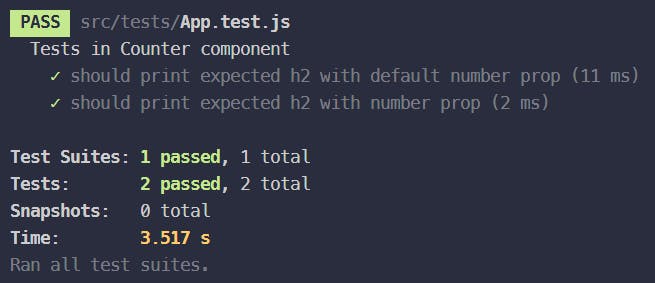
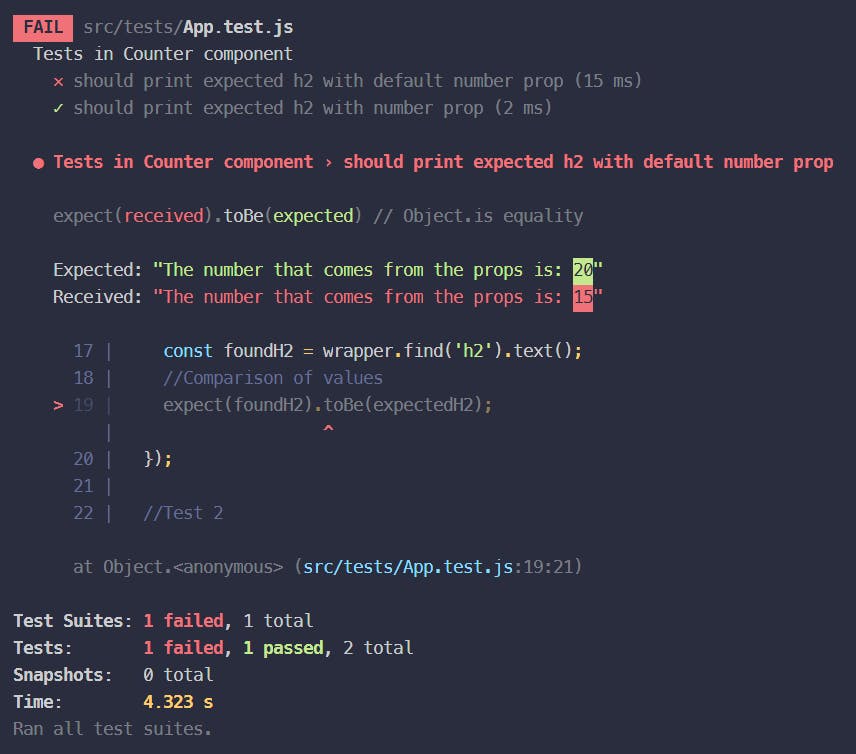
Our two tests pass 🟢 because the values we sent match the expected ones. Try changing, in the first test, the value 15 to any other number, like 20, and re-run the tests. You will see that the first test fails 🔴 because we expected 15 (the default value) and received 20.
Event tests
Now, what if we want to test if our click events are working OK or not. 🤔 Enzyme makes it easy to simulate events like clicks. Let's add another test bundle that will contain our tests for both buttons.
//Test bundle
describe('Event tests in Counter Component', () => {

  //Test 3
  test('should subtract 1 by clicking - button', () => {
    //Expected value after clicking (15 - 1 = 14)
    const expectedValue = '14';
    //Simulation of the component rendering (with no prop)
    const wrapper = shallow(<Counter />);
    //Button that will be clicked
    const addButton = wrapper.find('button').at(0);
    //Simulate click event
    addButton.simulate('click');
    //Found value after clicking
    const foundValue = wrapper.find('p').text();
    //Comparison of values
    expect(foundValue).toBe(expectedValue);
  });

  //Test 4
    test('should add 1 by clicking + button', () => {
    //Expected value after clicking (15 + 1 = 16)
    const expectedValue = '16';
    //Simulation of the component rendering
    const wrapper = shallow(<Counter />);
    //Button that will be clicked
    const addButton = wrapper.find('button').at(1);
    //Simulate click event
    addButton.simulate('click');
    //Found value after clicking
    const foundValue = wrapper.find('p').text();
    //Comparison of values
    expect(foundValue).toBe(expectedValue);
  });

});
For both tests, first, we create a variable that contains the value we expect. Then, we simulate the render and select the respective buttons for each action we want to test. Finally, we simulate the click to each button, obtain the value after the click, and compare it with the expected value.
Our counter starts at 15 because we did not pass any prop. Try adding it and changing the expected value depending on what button you will simulate.

And that is it! 🥳 Making tests is as simple as that. 😀
Bonus: Where do I keep my test files?
I like to keep them inside a test folder 🧪📁, but many people prefer to keep them next to the components themselves. I recommend you read this post. It is an excellent guide for naming and storing your components. 😉
Conclusions
Now, you have a notion on how to make tests in React. 😎 That will be a fantastic addition to your toolbelt. 🧰 It will save you some headaches trying to find hidden bugs. 🐞
If you are wondering, how do I make tests for custom hooks or HTTP requests? Don't worry I will post an article talking about it. 😉
Thanks for reading! 📖 If this post helped you, please give it a reaction. And If you have any contribution, comment, doubt, or recommendation, write it down in the comments section. It helps me a lot to improve my content. 😃
See you in the next post. 👋